
Replacing Cloth Diaper Elastics
By Sadie Cora and Kelli Calzada, TCO Advocates
A great way to build a great stash of cloth diapers for your baby is to get diapers preloved! If you’re just starting to collect a preloved stash, check out this guide on our blog.
If you’re even just slightly handy with a needle, you can acquire diapers that are in need of basic repairs, such as elastic replacement, for a steal! Certain brands are known for relaxed elastics, but it’s an easy and quick repair that you can do yourself, even without a sewing machine! Because we accept items in need of these kinds of repairs at TCO, we have had lots of practice at replacing elastics efficiently, without damaging your diapers or lowering their future resale value. (It’s good etiquette to disclose replaced elastic when you sell diapers, so keep that in mind).
We have seen lots of guides floating around online that recommend cutting the fabric, which we have found to be unnecessary extra work (and will reduce future resale value). It can also irritate baby’s skin to have exposed stitching. Read on for a step by step tutorial on how to replace elastics without damaging your diapers!
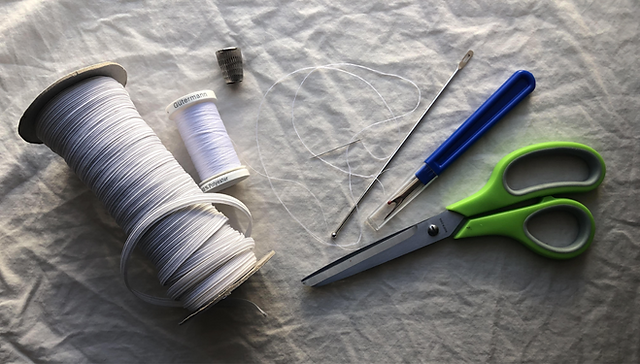
Diaper repair supplies
Left to right: elastic, polyester thread, thimble, ball point bodkin, seam ripper, and scissors.
First, gather your supplies!
There’s no need to buy a specially made diaper repair kit. You can pick up everything you need at your local craft store or on Amazon for much less money!
Here’s what you need: polyester thread, a roll of ¼ inch braided elastic, a seam ripper, scissors, and a sewing needle. A ball point bodkin makes it much easier to thread the elastic through (it’s well-worth the few dollars, as it saves a lot of time!). We also recommend using a thimble to protect your fingers!
Explore your diaper
Then, check out how your diaper is constructed. We are using a pocket for an example, but will share variations for other styles at the end of this post. (If you’re repairing preloved diapers, be sure to wash and sanitize before doing this!)
Turn the pocket diaper inside out so that you can see the PUL. Before putting your time and energy into repairing a diaper, make sure that the PUL is intact so the diaper will actually work once repaired. Check for small cracks and holes, especially along the edge of the elastic casing. Bad PUL is not repairable, so the diaper probably won’t be worth your time and effort to repair.
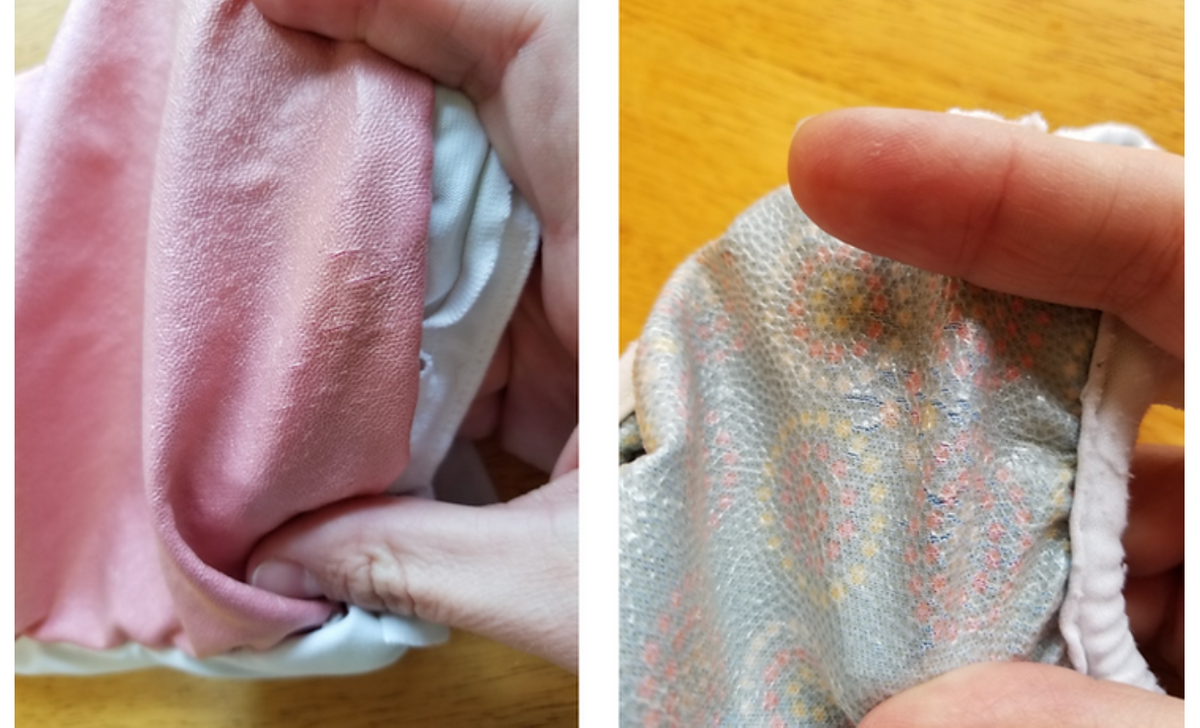
Examples of bad PUL.
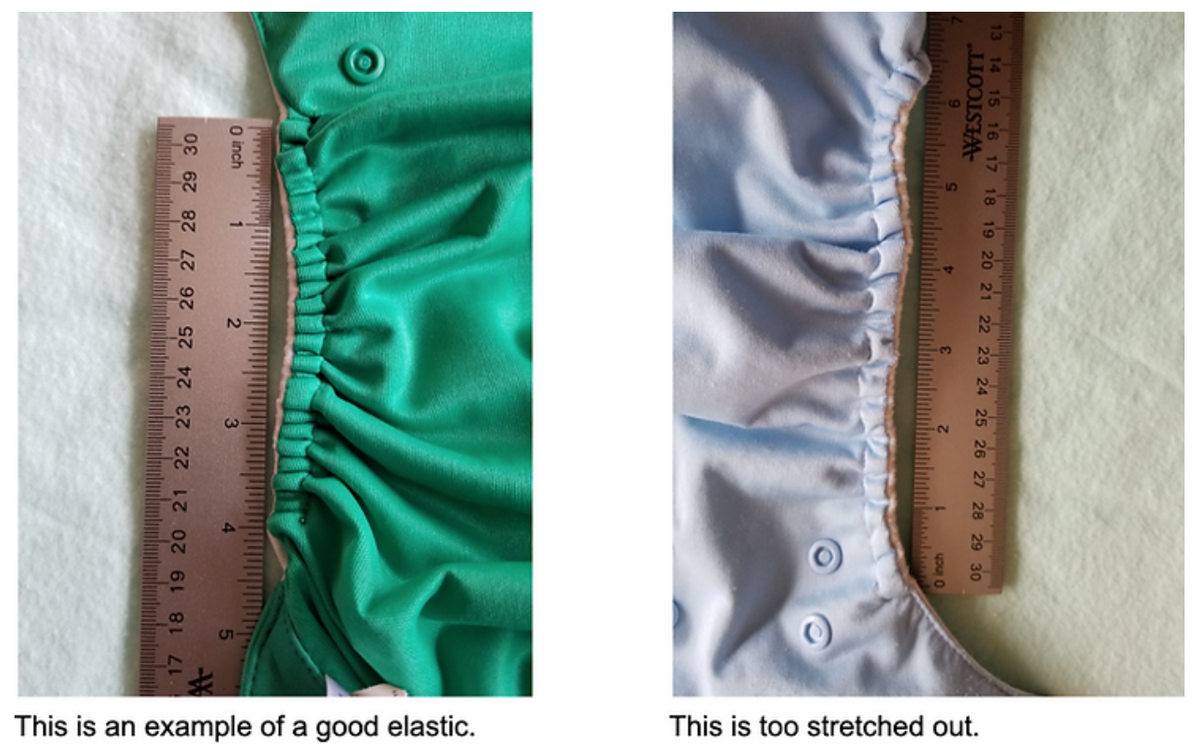
Once you confirm the PUL is good, look for where the elastics are sewn in within the elastic casing (the fabric that encases the elastics along the leg openings). Some brands are sewn in on each end only - for those you will remove the old elastic completely. If the elastic is sewn in along the full length of the casing, you will just leave it there and add a new elastic, sewing it down on both ends. Some brands have the ends of the casing sewn closed - for these you will grab your seam ripper and remove about ½ inch of the stitching at either end to expose where the elastic is sewn in. Other brands leave both ends of the casing open, making it extremely easy to replace the elastic. Most diapers have three elastics - the back elastic, and 2 leg elastics. Usually they are attached in similar ways. Check the ends of all three locations so that you can see how they are attached. Measure the elastics to see if they are stretched out. You can often see how the elastic is thinning and worn on the ends where it's attached, or feel that it's lost its spring. That tells you it needs to be replaced.
Remove old elastics if necessary
Expose the ends of the elastics, and carefully cut or seam rip the relaxed elastics out. Be careful not to cut the fabric of the diaper itself. If the casing is sewed closed on the end, you only need to seam rip out the stitches to expose the elastics, and leave the rest of the elastic casing closed.
You’ll probably be able to see how the elastic is broken and relaxed. If the elastic is sewn down for its whole length, just leave it. You’ll sew down your new elastic on both ends, right on top of the old elastic.
Now, cut your new elastics. For most brands of one sized diapers you will cut the elastic to 4 ½ inches long. A few brands, such as Nicki’s and Imagine, use 5 inch leg elastics. For smaller sized diapers we usually cut the new elastics to 4 inches; for larger sized diapers we cut to 5 inches. Some of us use 4 inch elastic on diapers with really soft gussets. If the elastic is too short it will be lumpy in the gusset. If too long, you could have leaking from the leg elastics being too loose.
Sew in new elastics
It’s time to sew in your new elastics! Carefully sew the new elastic in on the seam allowance (the ¼ inch of fabric where the diaper is stitched) on one end of the elastic casing. We do 4-5 whip stitches on each side and the end so that the elastic is well-anchored. Knot securely and cut your thread, giving the knot plenty of space (cutting to close can make the knot come undone). Then, thread your bodkin through the elastic casing and loop your new elastic through the eye of the bodkin. Pull it through so that the elastic lies flat within the elastic casing, and sew down the other end. Repeat the process of sewing the elastic down on the other end. Be careful not to pierce the PUL within the diaper as you sew- just sew into the seam allowance. Some people like to use a sewing machine to sew down the elastic.
Repeat this process for all 3 elastics within the diaper. If you seam ripped open the end of the elastic casing, you may choose to sew it back closed, using the existing holes in the PUL - or you can just leave it. You’re done! It will get quicker with more practice!
You can do all of this by hand! But if you prefer a sewing machine, that works too. Here’s a video from Kelli showing how! And here’s a video of the whole process!
Adjustments for other types of diapers
Variations for other types of diapers:
For all in ones without a pocket (such as Bumgenius Freetimes), carefully seam rip open the center section of the top front seam (above the snaps). Then, you can turn the diaper inside out just like a pocket and replace the elastics as described above. To finish, stitch the top front seam closed along the original seam holes.
For covers with encased elastics, carefully seam rip the ends of the elastic casings. For some brands with very soft gussets, like Flip covers, the results are much better when you completely remove the old elastic to replace it. When finished, sew the end of the casing closed.
For pocket diapers with an inner gusset like Rumparooz you can simply leave the relaxed gusset elastic and only replace the outer leg and back elastics. If you feel adventurous and want to replace the inner gusset the easiest way to do this is to use your seam ripper to open a small area at each end of the gusset, being very careful not to damage the lining. Use ⅛ in braided elastic cut to 6.5-7 inches depending on your preference. Sew down one end of the elastic and carefully, using a bodkin or small safety pin, run the elastic through the innermost part of the gusset where the original elastic is sewn down. Sew down the other end and stitch the openings closed.
Prefer to use a sewing machine? No worries!
If you want to use your sewing machine, the process is the same with the exception that you want to pin down the elastic end and use a short stitch length to attach the elastic in the seam allowance. Be sure to avoid running over your pin and breaking your needle! To avoid over zealous machines accidentally running stitches onto the diaper body, it is wise to stitch parallel to the elastic rather than perpendicular.
Run 3 to 4 stitches and back stitch 3 to 4 stitches about 4 times making sure you’ve anchored the elastic well.
You can also use your machine to close any casing ends you may have opened. Use a wide stitch length following the original stitch placement, make sure to backstitch at the beginning and end of your stitches. You may need to pull the casing straight as the new elastic will have gathered it, even at the ends.
And you’re done! Enjoy the diapers’ second life with new elastics!
We occasionally offer diaper repair workshops on Zoom! Reach out if you're interested.